Synchronization in LabVIEW – Part 1
LabVIEW offers several types of synchronization tools
Introduction
LabVIEW uses data flow to sequence code execution. This approach offers inherent multitasking capabilities, including parallel tasks managed in multiple while loops. However, almost immediately, a desire arises to communicate between parallel tasks.
So, these tools are very useful in designing automated test systems.
Poll – MES Integration – Vote and see how your peers voted!
Occurrences, Notifiers, and Queues
LabVIEW offers several types of synchronization tools. They can be placed into two groups.
- Occurrence, Notifier, and Queue
- Semaphore and Rendezvous
The first group pauses execution of a piece of code until data is available or a condition is met. For example, perhaps you need to wait on a temperature controller for an aircraft hydraulic system to reach a certain pressure before moving a part and the pressure is being controlled in a parallel loop.
Note that Notifiers are supersets of Occurrences, since they can pass data, whereas Occurrences cannot. So, I’m just going to talk about Notifiers.
The second group manages access to a piece of code based on the actions of multiple data sources. Another blog post will cover the second group.
The beauty of these tools is that they don’t need to be polled. They are event-driven and consume very little CPU usage: your paused code essentially goes to sleep.
Notifiers
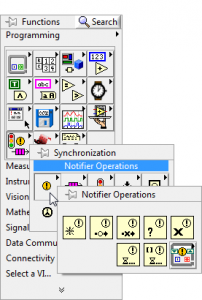
Notifiers are a sophisticated version of Occurrences. In fact, NI recommends that you use these instead of Occurrences. Notifiers are found in the sync palette as shown next.

Notifiers have basic operations for Obtain, Send, Wait, Status, and Destroy. Notifiers have the Timeout and Ignore Previous features similar to Occurrences. They can also be named which allows a Notifier to be found elsewhere in your code without needing a connecting wire. Plus, they can pass data from the producer to the consumer and are thus defined with a data type.
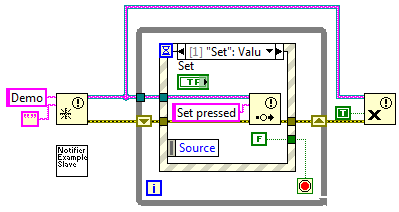
An example of usage follows in the 2 block diagrams. The first is the main VI. The Notifier is created on the left side of the diagram with the name “Demo”. The data type associated with this Notifier is a string. The subVI ‘Notifier Example Slave’ is placed on the main block diagram with nothing wired to it. That’s because the slave VI takes advantage of the fact that the Notifier can be obtained by a lookup from its name. See the slave diagram below for details.
The main VI waits on a button press events from the ‘Set’ button. Upon each ‘Set’ event, the Notifier is set and the string “Set Pressed” is passed. When the main VI is stopped, the Notifier is destroyed. Note the non-default use of the ‘force destroy?’ Boolean. This Boolean must be set TRUE to force the destruction of the Notifier even though it is still in use within the slave VI.

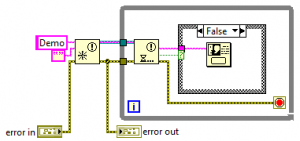
This second block diagram is from the ‘Notifier Example Slave’. Note that the Notifier is obtained with the same operation that creates the Notifier within the main VI (in fact, it’s not really clear which Obtain executes first). The slave loop then simply waits for the Notifier to be set. When the Notifier is set, the Message Box displays the string passed by the Notifier.

Note that there is no wiring between this loop and the main loop. And, yet, the main VI affects the execution of the slave by forcing the slave to delay execution until the main alerts it via the Notifier.
Also note that the use of the global ‘Stop?’ flag is not required here because the ‘Wait on Notification’ will error when the Notifier is destroyed in the main VI.
Notifier Options
The ‘Wait on Notification’ has a timeout option and the ‘ignore previous’ similar to the Occurrence.
If the ‘Wait on Notification’ is used in many places within various block diagrams, all of them will retrieve the same data passed by the ‘Send Notification’ operation. However, if multiple “Send” operations execute prior to a “Wait”, the last data written to a “Send” wins. This feature can simplify the structure of an embedded control application.
Also, the data type in the Obtain operation can be anything available in LabVIEW, such as a cluster, array, or variant. Because of this flexibility, the Notifier is a much improved Occurrence.
Queues
Queues pass data between two processes: one process pushes data onto a queue (enqueue) and the other consumes data from the queue (dequeue). The consumer process is delayed until data is available in the queue, making queues a mechanism for synchronization. Note that queues are also called FIFOs (First-in First-out).
LabVIEW Queues are similar to multi-element Notifiers. Both provide named “handles” for creation and access, hold arbitrary data types, handle multiple writers, and allow timeout periods before causing an error. Unlike a Notifier, a Queue does not have an ‘ignore previous’ option, because subsequent data pushes are always placed on the Queue (unless the Queue is full).
Queues are found in the sync palette at ‘Programming > Synchronization > Queue Operations’.
Queue Options
The number of elements available in a queue is set when you obtain the queue. By default, this size is unlimited (i.e., the size grows to handle any number of new elements). However, this behavior embodies poor programming practice because an application could die a slow death as memory becomes completely consumed. A better approach sets a nominal queue length and monitors for full queue status. A full queue implies the consumer cannot consume elements as fast as they are pushed by the producing code.
Also, LV Queues have an operation to enqueue data to the front of the Queue, rather the normal back of the queue. Thus, you can create a LIFO (Last-in First-out) queue, which is handy if you want to prioritize Queue elements.
Continue on to Synchronization in LabVIEW – Part 2 here.
Alternatively, if you’re bored with this topic but you’re deep into learning mode, check out these resources: